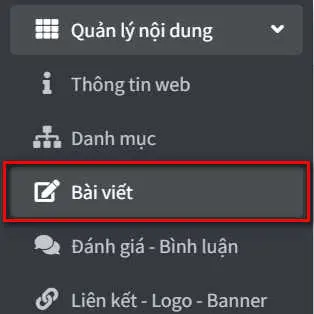
From the Left Menu, click on "Bài viết" to enter "Quản lý bài viết"
Guide to Managing Posts
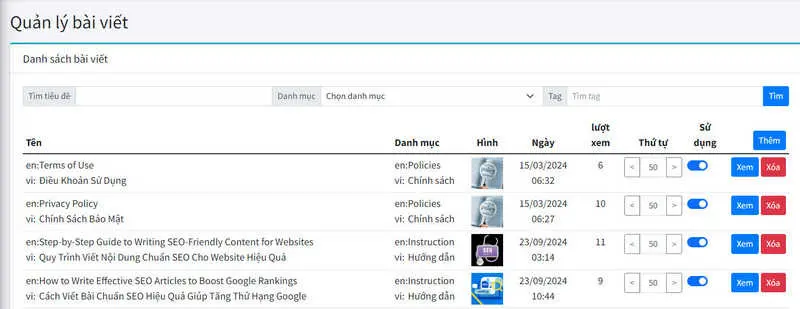
The post management screen displays a list of all existing posts with detailed information:
Post Information Columns
- Post Title: Displays the post title in both languages (if applicable).
- Category: Displays the category of the post.
- Image: The accompanying image.
- Date: The date the post was published or last edited.
- Views: The number of views, indicating reader interest.
- Order: The priority order in which the post appears on the page.
- Status: Shows whether the post is published or hidden.
Functions on the Management Screen
- Search: Use the search bar to quickly find posts based on title, category, or tags.
- Add New Post: You can add a new post from this list by clicking the Add button in the upper-right corner.
- View or Delete: You can click View to edit or review a post, or click Delete to remove unnecessary posts.
Guide to Creating a Post
From the Posts List, click on "Thêm"
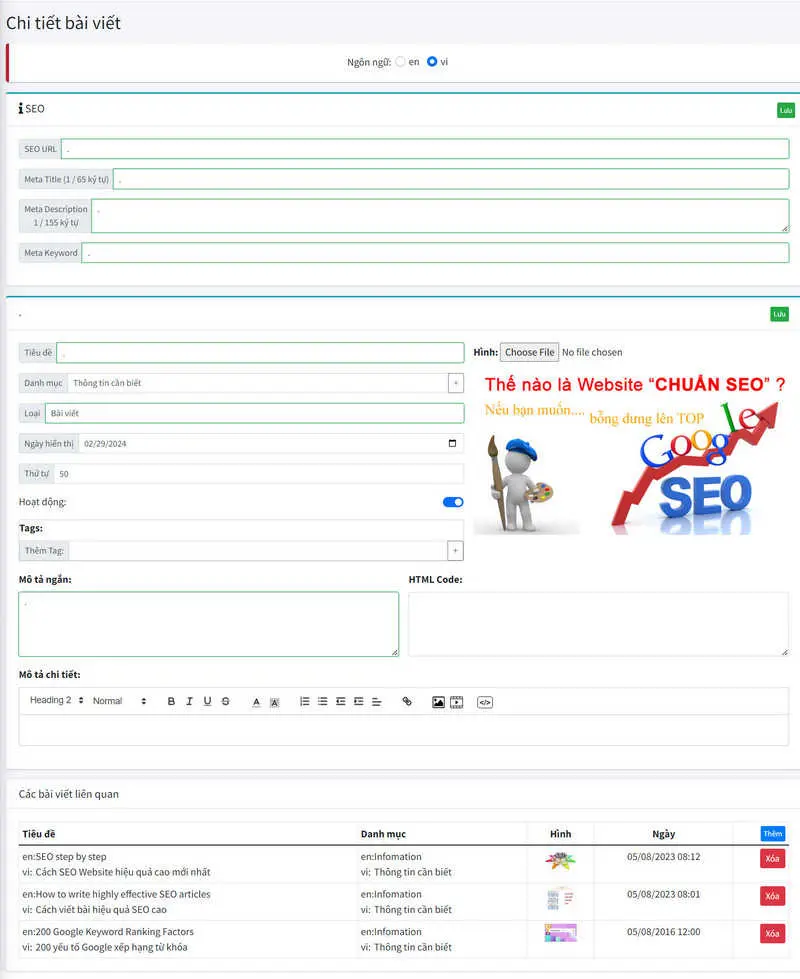
Step 1: Choose Language
First, you can select the language for the post by choosing between "en" (English) or "vi" (Vietnamese) at the top of the interface.
Step 2: Update SEO Information
- SEO URL: Enter an SEO-friendly URL to improve the post’s visibility in search engines.
- Meta Title: The SEO title should include the main keyword and be no longer than 65 characters.
- Meta Description: This is a short description of the post content (up to 155 characters). It should be engaging and include the main keyword.
- Meta Keywords: Enter relevant keywords for the post, separated by commas (,).
Step 3: Add Post Information
- Title: Set the main title of the post; it should be clear, concise, and engaging.
- Category: Choose the appropriate category for the post.
- Post Type: Select the post type between the options: Article, News, Blog. This helps define the style and content of the post.
- Display Date: Select the date when the post will be published.
- Order: Set the order of priority for the post, with lower numbers appearing first.
- Status: Toggle the post’s status to publish or unpublish it.
Step 4: Add Image and Content
- Image: Upload a relevant image to capture the reader’s attention.
- Short Description: Enter a brief description of the post, which will display on the homepage or as a preview on social media.
- Detailed Content: This is where you input the full content of the post. You can use formatting tools to highlight text, add images, or insert links.
Step 5: Add Tags and Save the Post
- Tags: Add relevant keywords to help categorize and improve searchability.
- Save: Click Save to store the post information once you’ve completed all the steps.

